Google logo

Cross site tracking for WordPress and Shopify

As many of you know, ShopWP does not handle the payments and checkout process. Customers using ShopWP are instead sent to the default Shopify checkout page to finish the order.

One of the drawbacks to this approach is losing the ability to track where users came from during their purchase journey. Since the WordPress site and Shopify checkout pages are on different domains, the analytics tracking is complicated or lost altogether.

Thankfully, enabling this cross site tracking for ShopWP is pretty easy. In this article I’ll walk you through the whole process and get your analytics tracking working again.

So let’s begin!

Installing Google Analytics on WordPress

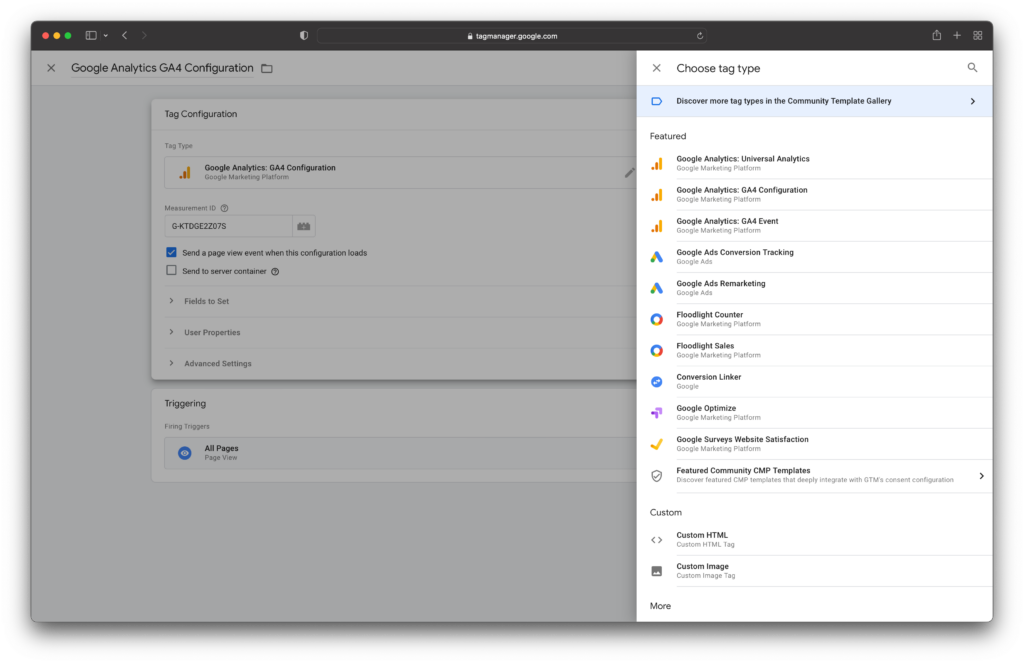
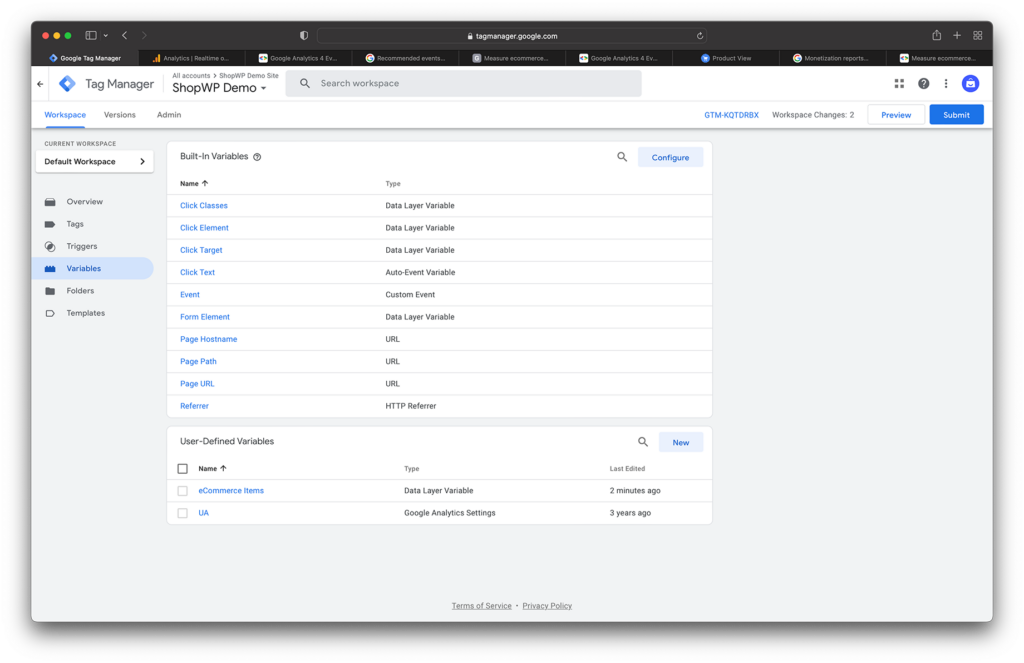
In order for the cross site tracking to work you must have Google Analytics installed on your WordPress site. Whether you’re using Google Tag Manager, adding the analytics embed script directly, or leveraging a plugin—the method doesn’t matter.

Just make sure it’s the same Google Analytics account that you want to connect to Shopify.

You should only be using one Google Analytics account.

Installing the Google Shopify app

After installing Google Analytics on WordPress we’ll also need to install it on Shopify.

The first thing you need to do is install Google’s Shopify app. This app will take care of sending the important ecommerce data into Google Analytics automatically for you. Nice huh?

First, login to your Shopify store.

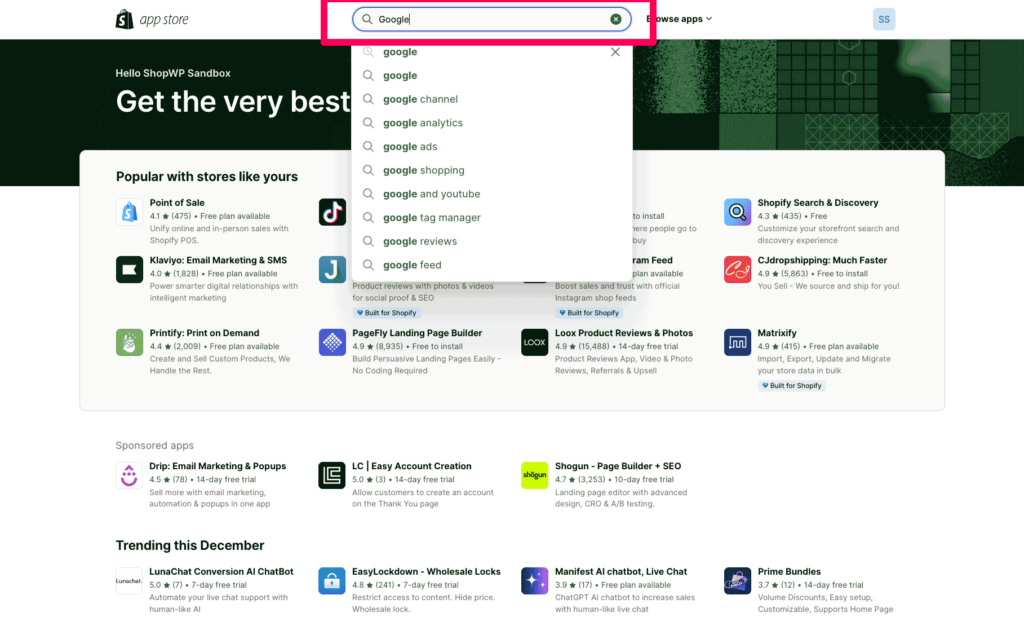
Once you’re logged in open a new tab and go to https://apps.shopify.com. Find the search bar, type in Google, and hit enter.

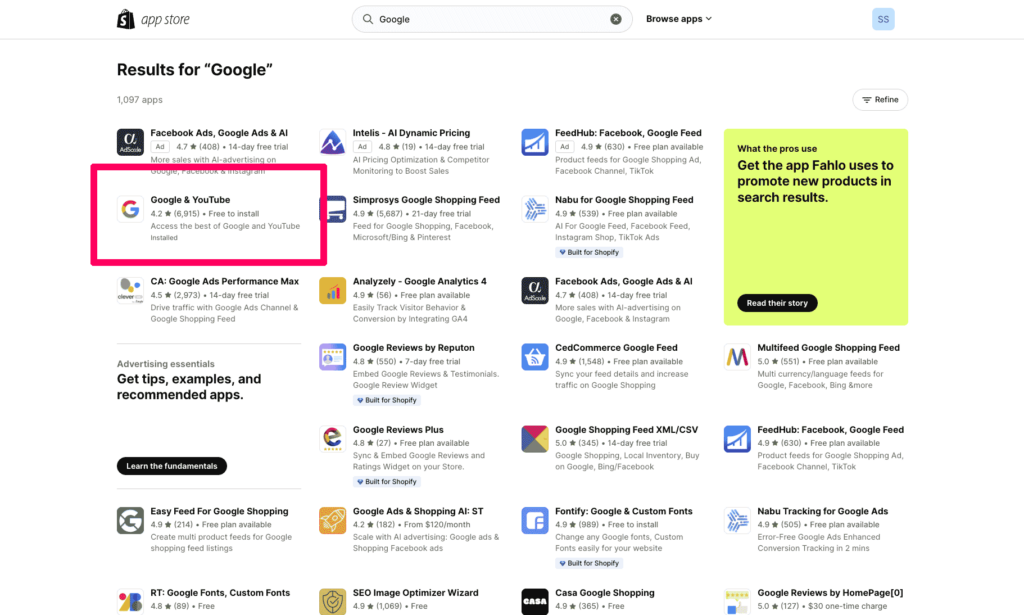
On the search results page look for the app called Google & YouTube. It should be the app with the Google logo. See screenshot below.

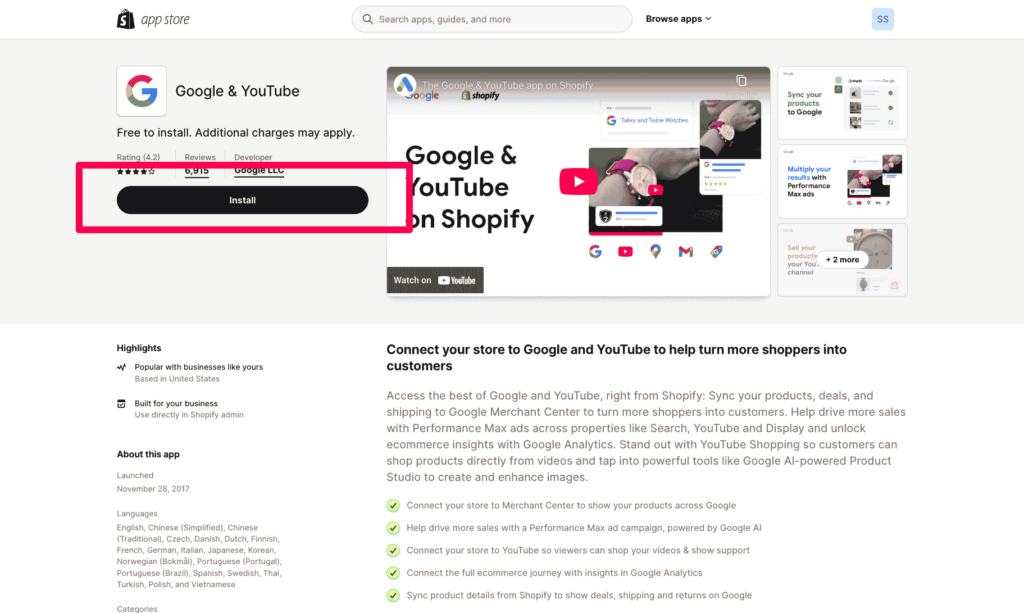
Finally, click the install button and follow the steps in the installation wizard to complete the process.

After installing the Google & YouTube app you’ll need to configure it. To do this, open the app and go through the connection wizard to connect your Google account to Shopify.

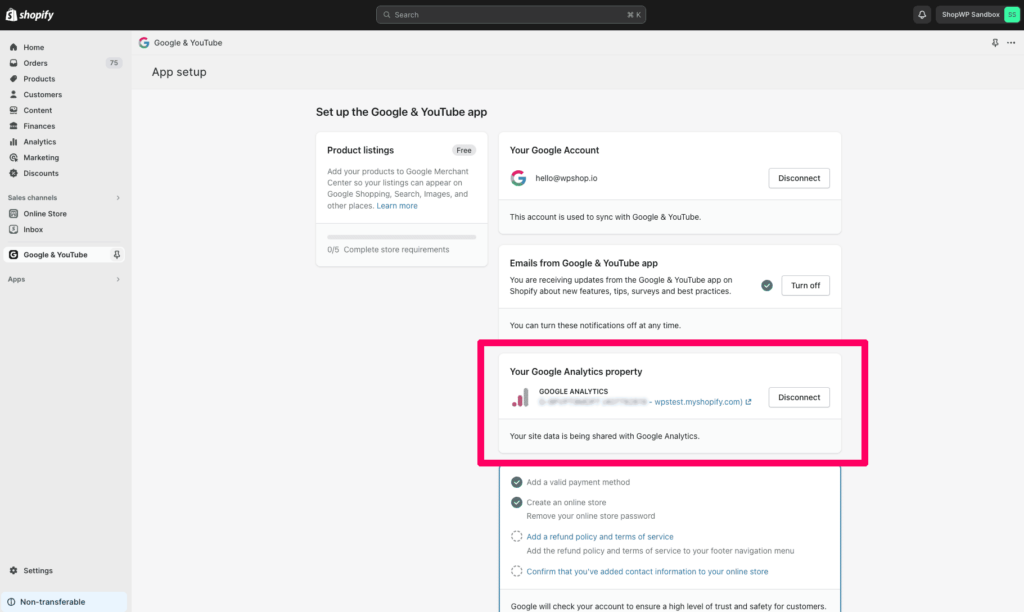
After the connection wizard finishes you should see your Google Analytics property listed on the app page. See screenshot below.

Finally, be sure to go to Online Store -> Preferences -> "Manage pixel here", and click the button to complete the configuration.

At this point you’re all set. Now it’s time to configure your Google Analytics settings.

Configuring your Analytics Account

The second step to make cross site tracking work is configuring your Google Analytics account. You won’t need to configure a lot so it’s pretty easy.

We’re going to add both the WordPress (and Shopify) domains to your data stream.

Let’s step through it.

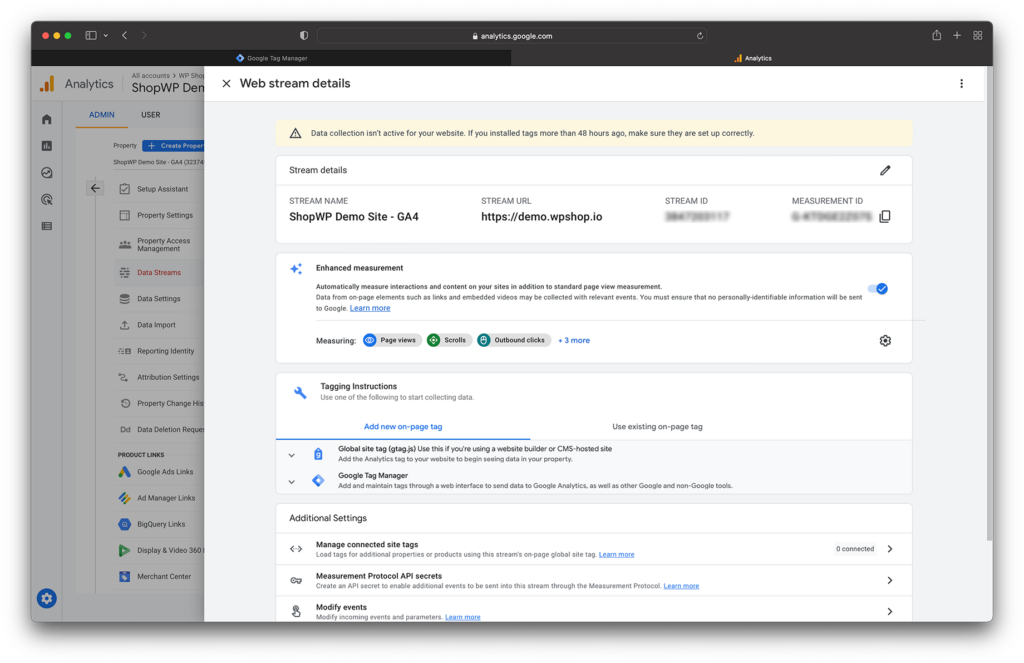
First, open your Google Analytics account and click the “Admin” settings link.

Next, click the Data Streams option like the screenshot below.

Click the specific Data Stream that relates to your account.

Once inside your Data Stream scroll down to the bottom and click the Configure tag settings option.

In the next screen click the Configure your domains option

Finally you should see a screen that allows you to specify domains. Make sure to enter both your WordPress domain and your Shopify domain. Even if you’re not using the “.myshopify.com” domain for checkout, make sure to add that as well. It should look something like this when you’re done:

You can also leave out the https and www parts of the domain.

After you’ve gone through the two steps above you should be done! The next step will involve testing that the cross tracking is actually working.

Testing the cross site tracking setup

To test that the cross site tracking is working, make sure to go through the above two steps first. Also make sure you’re on at least version 8.3.0 or greater of ShopWP.

During this process we’ll be making a test purchase in Shopify. So be sure to create a 100% off discount code beforehand, or enable test credit cards in your Shopify account.

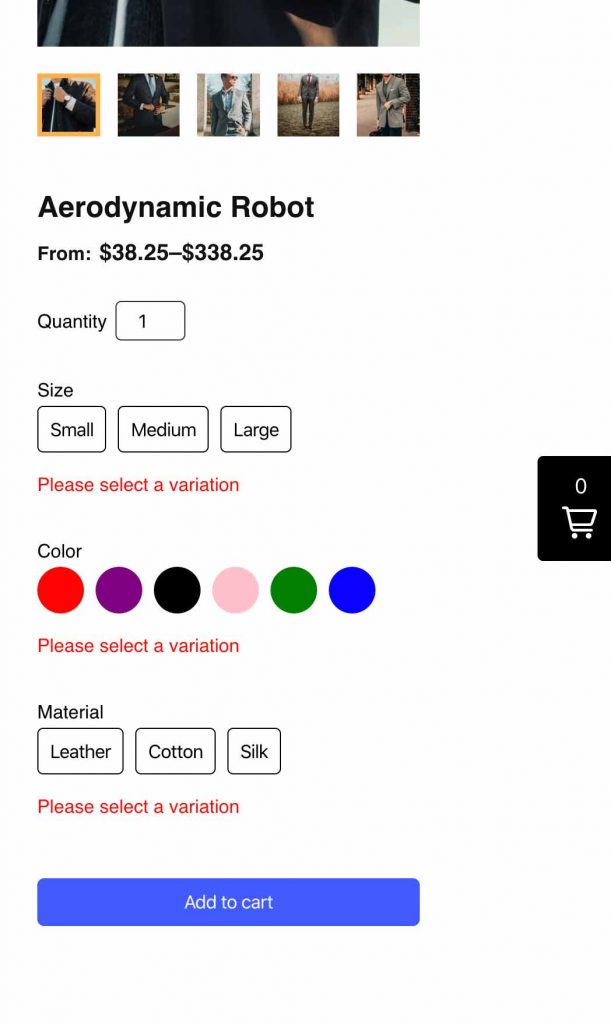
First, clear your browser cache and navigate to one of your product pages on WordPress.

Second, add something to the cart and click the “Begin checkout” button to start the order.

You should be redirected to the Shopify checkout page. Go through the full checkout and purchase the product as a test.

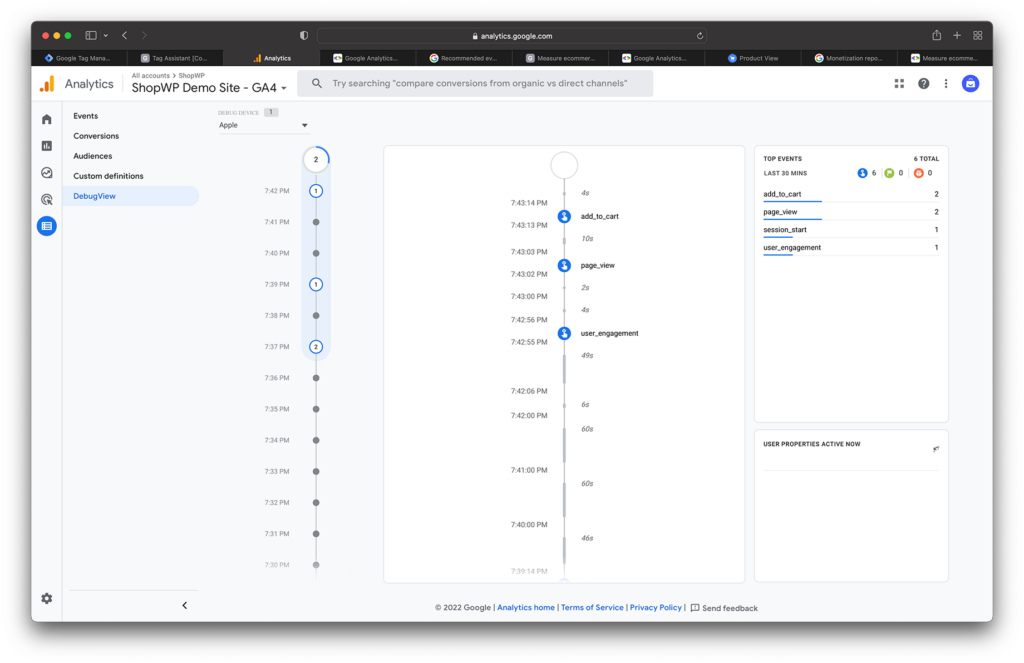
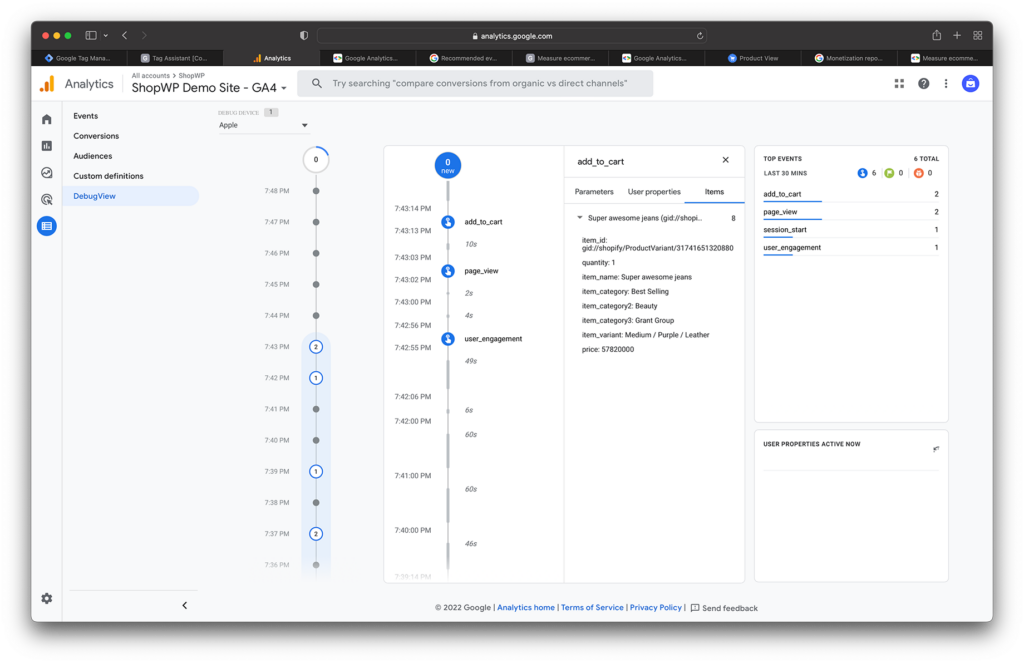
After purchasing, open your Google Analytics account and click the Reports icon.

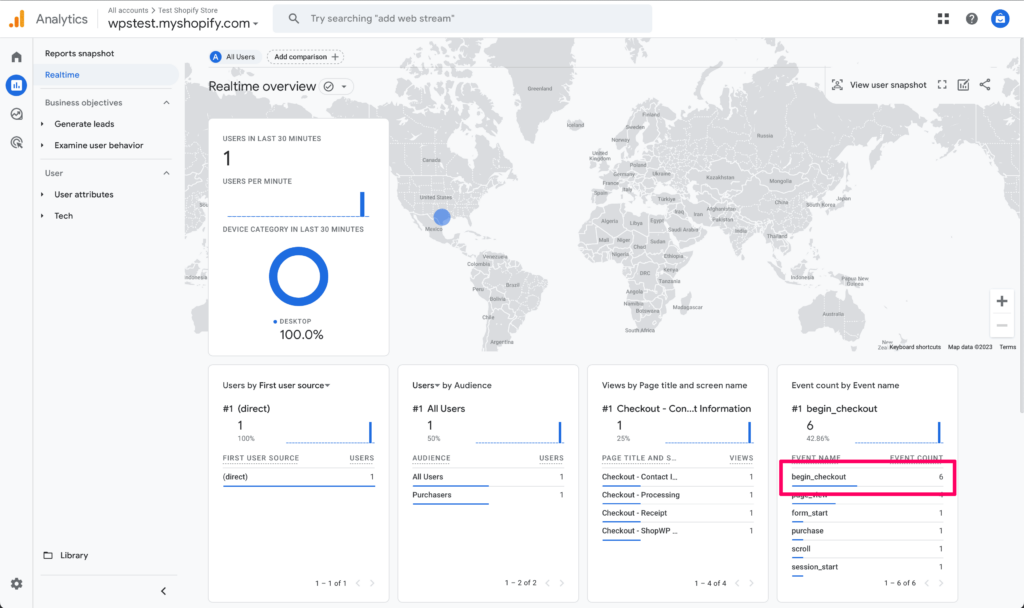
From there, click the Realtime section. You should see the ecommerce data for the purchase you just made in the boxes.

Look under the Events column and click the event name: begin_checkout

A new list should populate. You’ll want to click the Next page option.

On the second page click the page_referrer option

You should see your WordPress domain listed which confirms that cross site tracking is working properly.

If you don’t see the correct domains listed here, try waiting 10minutes or so. Sometimes there can be a lag in the realtime Google data.

Another thing to double-check is whether you have Google Analytics installed on your WordPress site. Google Analytics must be installed here as well.

Conclusion

That’s all there is to it. Thankfully Google has made this process much easier in Google Analytics 4.

Just remember that the important pieces are:

  • Installing and configuring the Google Shopify app
  • Adding all of your appropriate domains to the Google Analytics account

If you get stuck during at any step of the process please reach out and I’ll be happy to help.

ShopWP default page templates

How to manage your ShopWP product and collection pages

After installing ShopWP and connecting your Shopify store to WordPress, the first thing you’re probably wondering is: “Where do my products show up?”

This guide will explain how product and collection pages work in ShopWP, where to manage them, and how you can customize things to your liking.

The Default Pages

ShopWP comes with two default pages out of the box:

  • The Product Listing Page (PLP)
  • The Product Detail Page (PDP)

These two pages are not technically “pages”, but rather templates that you can customize.

These templates are created when the plugin is first installed. The design can be edited using the ShopWP Layout Builder tool by going to WordPress Dashboard - ShopWP Pro - Layout Builder.

You can create templates for the following pages:

  • Product Listing Page ( PLP)
  • Product Detail Page (PDP)
  • Collection Listing Page (CLP)
  • Collection Detail Page (CDP)

How the URLs work

ShopWP uses the native WordPress permalink settings to control the URLs for both your Product and Collection pages.

The URL you choose here will be used for both your PLP and PDP pages.

For example, if your site is https://example.com and your ShopWP Products URL is set to products, your product detail page URL will look like this:

https://example.com/products/super-awesome-product

The slug here is super-awesome-product and will match the slug you have set for your product inside Shopify. This is pulled over during a ShopWP sync.

Changing default page URLs

If you open the ShopWP General settings you’ll notice two URLs listed for your products and collections. These URLs are automatically set for you when the plugin is first installed.

By default, the products URL is set to /products and collections URL is set to /collections.

Your products and collections will show up here by default. To edit these URLs, you’ll need to open your WordPress Permalink settings.

You can set this to anything you want!

You don’t need a corresponding WordPress page to match the slug you choose.

Turning off default pages

If you don’t wish to use the default ShopWP pages you can turn them off in the plugin settings here: WordPress Dashboard - ShopWP Pro - Settings - General

Simply uncheck the “Enable default products page” and “Enable default collections page” settings.

Note: you may need to flush your WordPress Permalinks after turning these off.

Using a custom products page

If you wish to use your own custom products listing page you’ll need to do two things:

1. Turn off the ShopWP default products page (see above)

2. Change the products URL to match the slug of your custom page

For example, if you created a custom page called Shop with a slug of shop, then you’ll need to change the ShopWP products URL also to shop.

See below:

How detail pages work

ShopWP will create product and collection detail pages automatically for you during a sync. This is the main feature of the ShopWP syncing process.

Running a sync

1. First, open the “Sync” tab and use the One-time Sync button. This will attempt to sync all of your products.

If you don’t wish to sync all of your products you can adjust the syncing settings first. For example, only sync products from a specific collection or with a specific tag.

2. Once the sync is finished you will see a list of products within WordPress under ShopWP - Products.

Conclusion

That’s all there is to it! Creating pages in WordPress for your Shopify products using ShopWP is pretty easy and straight forward.

You can decide whether or not to use the built-in pages and also customize the page URLs. We’ve tried our best to make it as seamless as possible.

With the Layout Builder tool, you can also customize the design of these pages which really gives you full control over how your store will look—without messing with PHP code.

Someone holding a magnifying glass

Tracking ShopWP events with Google Analytics 4 and Tag Manager

In this article, I’m going to walk through how to track custom ShopWP events inside Google Analytics 4 (GA4) using Google Tag Manager (GTM).

For the purpose of demonstration we’ll be tracking a simple “add to cart” event. However this same technique can be used for any ShopWP event.

Let’s get started!

Upgrading to Google Analytics 4

According to Google …

  • Universal Analytics properties will stop processing new hits on July 1, 2023.
  • 360 Universal Analytics properties will stop processing new hits on October 1, 2023.

I wanted to mention this as it’s pretty important.

If you haven’t started migrating yet, please start soon! You’ll need time to tackle it. 💪

With that said, tracking ShopWP events should work in the older Universal Analytics as well. However this guide will only focus on GA4.

Here are some great resources to help with the GA4 upgrade:

Deciding which events to track

The first thing to do before configuring the events is deciding what to track. You may already have an idea of which events would be useful, but I recommend making a list somewhere to reference later.

You can get very granular and specific with the tracking, so I recommend keeping it simple to start. That will prevent you from being overwhelmed.

Here is a short list of tracking ideas

  • Adding / removing products to cart
  • Viewing products
  • Begin a checkout
  • Interacting with product variants
  • Open / closing cart

Step 1 – Creating a GA4 tracking tag

As I mentioned earlier, I’ll be demonstrating how to track the ShopWP “Add to cart” event.

However before we can do that we need to configure Google Tag Manager and Google Analytics. This requires some setup, so let’s do that now.

To begin, open your GTM dashboard.

Now click Tags within the sidebar nav.

Create a new tag for the Google Analytics 4 configuration. This will allow you to embed GA4 into your website.

Note: If you already have GTM installed you shouldn’t need to do this. But if you’re using the old UA embed, you may need to remove that and replace it with GTM.

Within the tag edit screen, click Tag Type and choose Google Analytics GA4 Configuration.

After bringing you back to the Tag Configuration screen, you’ll need to enter your Measurement ID.

To find your Measurement ID, you’ll need to open your Google Analytics dashboard. From there, click Admin – Data Streams. Then click your property name.

You should see a screen that looks like this:

The Measurement ID can be found on the right-hand side.

Now head back to Tag Manager and enter the Measurement ID.

Next, click the Triggering section and ensure “All pages” is enabled.

Afterwards it should look like this:

Finally, go back to the Tag Manager dashboard and click the blue “Submit” button and publish your changes.

Now that you have a tag setup to add GA4 to your website, you need to add the actual GTM embed code to your site. If you’ve already done this you can skip to step 2. Otherwise, keep reading.

Go back to the GTM dashboard and click Admin. Then click Install Google Tag Manager within the container settings. You should see a screen that looks like this:

Follow the steps to install GTM on your site. Once you’re done we can start adding our custom event tag.

Step 2 – Adding Ecommerce GTM variables

Our goal is to pass additional data about the product when the “add to cart” event occurs. This will help us better understand which products are being interacted with.

To do this, we need to create a custom GTM variable to store this information.

Start by opening the GTM dashboard and clicking Variables. Then click “New” under the User-Defined Variables section.

Give the new variable a name, such as “ecommerce Items”.

Next, click the Variable Configuration box and choose Data Layer Variable.

Set the variable name to: ecommerce.items.

It should look like this:

Click Save and you should see your new variable listed at the bottom. Make sure to publish your changes by clicking the blue Submit button toward the top.

Step 3 – Adding the custom add to cart event

Now that we have our GTM variable created we can create our custom event tag.

Wahoo! 🙌.

We’ll be following the same steps that Google describes in their measure ecommerce guide. I highly recommend giving it a read.

Ok, let’s start by opening the GTM dashboard and clicking Tags, then New.

Give the tag a name such as: ShopWP add to cart event

Next, click the Tag Configuration box and choose Google Analytics: GA4 Event.

Under the option “Configuration Tag”, make sure to select the GA4 configuration we created earlier. This will ensure that the custom event data is passed to Google Analytics.

For Event name enter: add_to_cart

The name add_to_cart is recommended by Google since it’s supported throughout the whole Google Analytics ecosystem as well.

For Event Parameters, click Add Row and set the Parameter Name to items.

Inside the value field, click the plus icon and choose the ecommerce Items variable we created earlier.

It should look like this:

Next, open the Triggering section.

Within the Choose a trigger screen, click the plus icon in the top right.

Name the trigger: Event add_to_cart.

Within Trigger Configuration choose Custom Event.

Set Event name to: add_to_cart. (Note: this is important as it must match the event name in our tag.).

Finally, make sure the box “All Custom Events” is selected.

It should look like this:

At this point you should have all the fields filled out for the custom event tag. Click Save and make sure to publish all your changes.

Step 4 – Running the add to cart event

So now that we have everything configured inside Google Tag Manager, the next step is to add some custom JavaScript to our WordPress site. This code will be responsible for “firing” the custom event and passing the data to Google Analytics.

Copy and paste the below code to your WordPress theme’s JavaScript. If you don’t know how to do this, I’ve written a detailed guide on setting up a custom JavaScript file that you can read through.

For a full list of available attributes to send, reference the GA add_to_cart event page.

wp.hooks.addAction(
	'on.afterAddToCart',
	'shopwp',
	function (lineItems, cartState) {
		if (lineItems.length) {
			dataLayer.push({ ecommerce: null }) // Clear the previous ecommerce object.
			lineItems.forEach(lineItem => {
				let variantId = lineItem.merchandiseId
				cartState.lines.edges.forEach(line => {
					if (line.node.merchandise.id === variantId) {
						const dataToPush = {
							event: 'add_to_cart',
							ecommerce: {
								currency: line.node.merchandise.price.currencyCode,
								value: Number(line.node.merchandise.price.amount).toFixed(2),
								items: [
									{
										quantity: lineItem.quantity,
										item_id: line.node.merchandise.id,
										item_name: line.node.merchandise.product.title,
										currency: line.node.merchandise.price.currencyCode,
										item_category: line.node.merchandise.product?.collections
											? line.node.merchandise.product.collections.edges[0].node
													.title
											: false,
										item_category2: line.node.merchandise.product?.productType
											? line.node.merchandise.product.productType
											: false,
										item_category3: line.node.merchandise.product?.vendor
											? line.node.merchandise.product.vendor
											: false,
										item_variant: line.node.merchandise.title,
										price: Number(line.node.merchandise.price.amount).toFixed(
											2
										),
									},
								],
							},
						}
						dataLayer.push(dataToPush)
					}
				})
			})
		}
	}
)

Here’s what the code is doing: we listen for the ShopWP “add to cart” event. When that runs, we’re calling some GTM code and passing the product data to Google Analytics.

Make sure this code snippet is added to your theme’s JavaScript and not the functions.php file.

Step 5 – Making sure everything works

Now that we have everything in place, let’s make sure it works.

Open the Google Tag Manager dashboard and click Preview. This will open a modal where you can type in your website.

Then click Connect.

This will open two pages: one for your website and another for the GTM Tag Assistant.

Now navigate to a page that displays a ShopWP buy button and add something to the cart. This can be any page with a ShopWP product.

Afterwards, open the GTM Tag Assistant page. You should see the event listed on the sidebar like this:

You can also reference Google’s test ecommerce store to see how the data is structured.

Ok, now let’s confirm that the event shows within Google Analytics as well. Open your GA4 dashboard and click the Configure sidenav link. From there, click DebugView.

You should see an event toward the top of the timeline called add_to_cart like this:

Clicking the add_to_cart event should show a new pane with a tab labeled Items.

Click Items to see all the product information passed from the JavaScript code we added earlier. We’re using the standard Google Analytics ecommerce tracking method, so everything should be integrated appropriately throughout GA4.

Congrats! You’re now tracking the ShopWP add to cart event within GA4.

As you can imagine, this is only the start of tracking all sorts of interesting information regarding the way your customers interact with your products.

For example, now that you’re tracking add to cart events, you can follow the same steps to track when a product is removed from the cart as well.

Start simple and tweak as needed. If you run into any problems, please reach out via email with any questions.

Good luck!

Yotpo logo

How to generate your Yotpo API keys to use with ShopWP

Before you can begin using Yotpo with ShopWP you need to generate a pair of API keys. The process is fairly straight forward but does require a few steps. I’ll walk you through each step one at a time. Let’s begin!

Open your Yotpo Dashboard

Head over to yotpo.com and login to your account. You’ll see your dashboard like this:

Screenshot of the Yotpo Dashboard

Once you have your Yotpo account open, click the profile icon in the top right corner. Click Settings within the dropdown that opens.

Screenshot of the Yotpo Settings menu

Generate the Yotpo API keys

Once you’re on the Settings page, you’ll see a section at the bottom called “API Credentials”. This is where your API keys will live.

You’ll see two fields, one called App Key and the other called Secret Key. Copy and paste the App Key somewhere to reference for later.

Yotpo Settings screen

Then click the “Get secret key” button. After you click this, Yotpo will send you an email with a special code to generate the secret key.

Yotpo generating API key

Check your email

You should see an email from Yotpo. If you don’t, check your spam folder. The email will look like this:

Screenshot of the confirmation email sent by Yotpo

The email itself contains a temporary access code that expires after one hour. It should be bold. Copy this code and click the blue “Yotpo General Settings” link.

Clicking this link will open your Yotpo settings page with a special place to enter your access code.

Yotpo entering API key

Click the blue submit button.

Save your secret key

Once you enter your temporary access code, Yotpo will finally generate your “secret” key. You should see a modal appear like this:

Yotpo creating API secret key

Copy the secret key and store it somewhere safe with your App Key from earlier. You’ll need to enter these two keys into the ShopWP plugin settings.

Add your Yotpo API keys to ShopWP

Now that you have both API keys, you can add the to ShopWP. Open the ShopWP plugin settings and find the section called “Reviews”. You should see two fields for the Yotpo API keys:

ShopWP Yotpo API settings

Enter both keys and click “Save ShopWP settings”. You should receive a confirmation notice at the bottom indicating that the API keys were saved successfully.

Entering the Yotpo API keys on the ShopWP settings screen

Congratulations! You’re done.

International globe and map

How to translate your Shopify products in WordPress

Starting in version 5.0 ShopWP Pro now comes with the ability to translate your product content into different languages and currencies. These two features are known as the “translator” functionality, and is ready to use today.

In this article, we’ll explore how to set this up and what to expect when using this feature.

Requirements

Before you can use the ShopWP Translator functionality, you’ll need to meet a few requirements. Shopify does not provide content translations natively, but instead relies on third-party apps to do this. So after installing a translation app, you’ll need to translate your product content there.

The main requirements are:

I should note that you can continue using a WordPress plugin to translate the rest of your content. You’ll only need the third-party translation app for your product-specific content.

How it works

In order for your Shopify store to support multiple languages and currencies, you must first “whitelist” them inside Shopify. ShopWP will then recognize these settings and update the WordPress content accordingly.

ShopWP does not maintain it’s own list of countries, languages or currencies. This may confuse you when loading the plugin settings and only seeing United States / English. You will only see the languages and currencies that you have enabled inside Shopify.

Ok, let’s start setting this up!

Creating a new Shopify Market

Shopify Markets is a relatively new feature which allows you to manage the experience of your store across different countries and regions. This will be the central place you go to configure your settings for each country. Let’s begin by accessing it.

First, open your Shopify settings and click the side link called “Markets“. Depending on your existing setup, you may only see one market listed.

Then click the Add market button to begin setting up a new market.

Screenshot of the Shopify Markets settings

Now give your Market a name. This can either be the name of the country or region you want to add. For this guide I’ll create a new market for Japan.

Now click the Add countries/regions button.

Screenshot showing how to access the Shopify Markets settings

After adding your region click done to exit the modal. You’ll then click the Save button in the top right corner to finish.

Screenshot showing how to choose a specific country / region for your market

Now you should see the main edit screen for your new Market. This will be the place where you can add languages, currencies, shipping info, etc.

Screenshot showing the settings for a single market

Adding a currency to your Market

Now that you have your new market created, you’ll need to make sure you have the proper currency assigned to it. This will be the currency that ShopWP uses as well.

Within your market edit screen, click the Manage link next to Currency and Pricing.

Shopify will attempt to find the currency automatically based on the region you chose earlier. If this isn’t the currency that you want to use, you can change it here. You can also adjust the prices of your products.

It’s important to note that you can only assign one currency to every market.

Screenshot showing the currency and pricing settings for a single market

How currency conversion works

One of the nice features of the new translator functionality is that ShopWP will lean on Shopify for all the heavy lifting–including currency conversions.

After switching currencies within the ShopWP settings, your product prices will be automatically converted into the currency you selected. This is done by Shopify using the current market exchange rate at the time.

For more details, read the Pricing in local currencies article from Shopify.

Adding languages to your Market

Every market you create can have one or more languages assigned to it. It will use your store’s default language automatically unless you change it. Shopify has written a nice guide that you can read on this.

Let’s add the language Japanese to our newly created market for Japan.

Begin by clicking the Languages side nav link.

From there, click the green Add language button in the top right corner.

Screenshot showing the language usage settings for a single market

Next, choose the language you want to add.

Screenshot showing how to add an additional language

The next step is important. It tripped me up at first. After adding the language you must manually publish it. You can do this on the same screen (see below screenshot).

Screenshot showing how to publish a specific market

After publishing, your new language will show up under the “Published languages” section. It should also give you a success notice.

Screenshot showing where your newly published market will be

Now that you’ve created a new language and set it to Published, you’ll need to tell your market to use it. To do this, go back to the Markets section and click the manage link to edit your market.

From there, click the manage link next to the “Domains and languages” section.

Scroll down and you should see your new language! Select it and click the save button.

Screenshot showing how to enable your market

Your market will now use your new language with ShopWP.

The only thing left to do is translate your product content by using a third-party Shopify app. Remember, Shopify will not automatically translate your content. You must translate everything using a separate app.

WordPress theme code on macbook laptop

How to create a child theme in WordPress (with examples)

There are many ways to make custom changes in WordPress. However, one of the most important to understand is using a child theme.

Let’s see how it works.

What is a WordPress child theme?

WordPress child themes allow you to safely add custom code to your “parent” theme.

For example, say I have the “Twenty Twenty-Two” theme activated and I want to add custom CSS to change the default buttons.

I could add custom CSS directly to the theme’s stylesheet, but this would be a bad practice. The reason? File changes made directly to a parent theme will be deleted after the theme is updated. Not good! 😰

So instead, the main benefit of adding customizations to a child theme is that they will not disappear after updating your parent theme.

You get to inherit all the great stuff about your theme, plus safely make any customizations that you want.

Cool huh? 😏

How do I make a WordPress child theme?

First, you need access to your WordPress files with something called FTP access. You can usually find this inside your webhost dashboard. If you’re unsure, just contact them and they’ll get you setup.

Step 1. Create the child theme folder

Assuming you have access to your website files, begin by making a new folder next to your parent theme.

Once you have the folder created, you’ll need to give it a name. A good rule of thumb is to use the same name but with a “-child” suffix at the end.

For example, I’ll name my child theme twentytwentytwo-child since my parent theme is twentytwentytwo.

Screenshot of the theme folder structure
Creating the WordPress child theme folder

There are two files required to make a child theme: style.css and functions.php. These two files are necessary to connect our child theme to the parent theme. It’s pretty simple, so let’s do that now.

Step 2. Add the style.css file

As mentioned, we need to create a file called style.css. This file will tell our child theme which parent theme to inherit.

Inside the child theme folder, create a file called style.css and then copy / paste the below code inside of it.

/*

Theme Name:	Twenty Twenty-Two Child
Template:     	twentytwentytwo

*/

What you added are called comment headers. They tell WordPress that we’re using a child theme and which parent theme we should inherit.

We’re telling WordPress that we want to inherit the Twenty Twenty-Two parent theme with the “Template” header comment. The value of this comment corresponds to the name of the parent theme directory. Your theme will probably be different, so make sure to change this value.

However for this to actually work, we need to enqueue our newly created style.css file.

Let’s do this now.

Step 3. Add the functions.php file

Like we did with style.css, we’ll now create another file called functions.php. Make this file at the same level as style.css like this:

Another screenshot of the theme folder structure
Example of how to create a child theme structure

Once you have this file created, copy / paste the below code inside:

<?php 
function child_styles() {
    wp_enqueue_style( 'child-theme-css', get_stylesheet_directory_uri() . '/style.css', []);
}
add_action( 'wp_enqueue_scripts', 'child_styles', 99 );

This imports (or enqueues) our child theme’s style.css file.

Congrats! 🙌 You’re close to having a working child theme. Let’s finish the process.

Step 4. Activate your new child theme

Now that we have our child theme created, the last step is to activate it.

Open the dashboard and click Appearance - Themes. You should see your child theme listed there without a screenshot. Simply click activate and you’re done!

There are more things you can customize with your child theme, but this is technically all you need. For a full list of child theme options, have a look at the official WordPress docs.

Using a child theme for ShopWP changes

ShopWP provides many opportunities for customization. For example, if you open the settings you’ll see different options for products, collections, cart, etc.

However, this is just the tip of the iceberg! There are tons of options for customizing core features of the plugin with small code snippets.

Where do these code snippets go? You guessed it. The child theme!

So let’s see how this works. 👇

Using JavaScript hooks

All the JavaScript hooks we provide require a child theme to use. The reason, is that the JavaScript you write needs to run after ours. The only way to ensure this happens is to import (or enqueue) your JavaScript at the right point. Also keep in mind that some of our hooks require ShopWP Pro.

To begin, create a new file in your theme called shopwp-scripts.js.

You can keep it empty for now.

Screenshot of the theme folder with the shopwp-scripts.js file
Example folder structure of a child theme

Next, open the functions.php file and copy / paste the below snippet at the very bottom below everything else, like this:

function theme_assets() {
    wp_enqueue_script( 'shopwp-scripts', get_stylesheet_directory_uri() . '/shopwp-scripts.js', ['shopwp-public'], '', true);
}

add_action('wp_enqueue_scripts', 'theme_assets');

Take a look at the code you just added. Do you see the shopwp-public part? This is the most important piece of the puzzle. This tells WordPress to load your custom JavaScript after ShopWP.

So now at this point, any hook you at to your shopwp-changes file should work. You can test this by adding the below JavaScript to the file:

wp.hooks.addFilter('product.titleText', 'shopwp', function (productTitle, productPayload) {
    return productTitle + ' plus custom text';
});

After saving the file, reload your products page and you should see the text “plus custom text” appended to every product title.

This indicates that your child theme is loading the custom JavaScript, and the ShopWP hook is running correctly.

Nice job! 👊

Using PHP hooks

In order to use the ShopWP PHP hooks, you’ll need to add the relevant code snippets to your child theme’s functions.php file.

For example, if you want to change the default color of all product title’s, you can leverage the shopwp_products_default_payload_settings filter like this:

add_filter('shopwp_products_default_payload_settings', function($payloadSettings) {

   $payloadSettings['title_color'] = 'green';

   return $payloadSettings;

});

That’s it!

Keep in mind that some of our PHP hooks require ShopWP Pro. If you’re unsure, look for the “pro-only” label when viewing the docs.

Best practices when using a child theme

As you’ve seen, creating a WordPress child theme is fairly straight forward. However there are some best practices to keep in mind.

Naming conventions

First, it’s a good idea to follow the standard convention when naming your child theme folder. The best practice is to use the name of the parent theme with -child appended to the end.

So if your parent theme folder is called twentytwentytwo, then name your child theme folder twentytwentytwo-child. Following this trend helps all WordPress developers quickly understand what’s going on, should you ever hand the project over.

Always consider using a child theme

You may be wondering, should I just always use a child theme? My answer would be yes. Unless your theme is completely built from scratch, it’s usually a good idea to automatically create a child theme anytime you purchase or install a new WordPress theme.

One of the nice things about many of the popular themes is that they will usually provide a drag and drop child theme in your purchase bundle. So instead of manually creating it yourself, you can just drag it into your wp-content/themes folder and be done.

Never edit your parent theme directly

I think it goes without saying but just to emphasis again, you should never directly edit your parent theme. If you do, you will lose your changes.

Some people may rationalize and tell themselves that it’s just one simple change, what could hurt? I’m low on time, I just need to get this one thing fixed.

While this may be true, I guarantee you’ll forget about that change in two months. Then you’ll update the parent theme and cause yourself more problems.

Overall, a child theme is a must have for any WordPress site owner that’s interested in making even small customizations to their site.

I hope this article was helpful, good luck!

An ocean full of boats

ShopWP upcoming feature: new product variant styles

One of the most popular requests for some time has been the need to have more control over product variants; both in functionality and style. Specifically, many people have asked for the ability to display “buttons” instead of the default dropdowns that the plugin provides.

With that said, I’m really excited to give a quick preview of how this is coming along in the upcoming ShopWP 3.0!

The current “Dropdown” style

The current dropdown style works consistently in many scenarios. It does a good job at “containing” multiple variants in a clean UI, among other things.

However one of the major drawbacks to this style is that it requires users to engage in multiple clicks just to see the available options. Clicking once to open the dropdown, and then clicking again to select the variant value. Between these clicks, the user needs to spend cognitive energy to understand what the dropdown is displaying, even if this happens in a split second.

ShopWP 3.0 will be introducing an additional “style” to the product variants called “variant buttons”. This will be something you can toggle on / off inside blocks, shortcodes, or programmatically. And don’t worry, dropdowns aren’t going anywhere.

So let’s have a look at how these work!

The new “Buttons” style

As you can see, the new style is very intuitive. I intentionally mimicked the design that many popular online stores like Target are using when it comes to buttons like these.

When the user clicks on a single variant choice, ShopWP calculates what other variants are possible from the first selection, and conveniently disables the other options for you. This makes it very clear to the customer what’s available to select and what’s not.

Color swatches

Another cool thing about the coming buttons style is that everything is filterable. I’ll be providing a few JavaScript hooks which will allow you to customize the HTML and CSS of the buttons themselves. This will open up big opportunities for making unique and powerful layouts.

For example, this means you can create color swatches with a very minimum amount of customization — directly from your theme!

In the above example, I’m filtering the buttons and checking whether the variant contains a “color”. If they do, I return a chunk of custom CSS that will apply only to those buttons.

Here’s a rough example of what that will look like. The product.variant.styles filter below allows you to customize the CSS of each button.

wp.hooks.addFilter('product.variant.styles', 'wpshopify', function(
      defaultCustomStyles,
      variant,
      isSelected,
      isSelectable
    ) {
      if (variant.name.toLowerCase() === 'color') {
        return (
          defaultCustomStyles +
          `
            background-color: ${variant.value};
            text-indent: 100%;
            white-space: nowrap;
            overflow: hidden;
            width: 40px;
            height: 40px;
            font-size: 0;
            opacity: ${isSelectable ? 1 : 0.2};
            border-radius: 50%;
            border: ${isSelected ? '1px solid ' + variant.value : 'none'};
            box-shadow: ${isSelected ? 'inset 0 0 0px 4px' : 'none'};
            transition: all ease 0.15s;
         `
        )
      }
    })

Handling errors

If the user attempts to add to cart before selecting the required variants, a small notice will show under each required variant instructing the user to make a selection.

An example of ShopWP missing product variant selections

That’s it for now! Excited to share more soon.